Monday, September 25, 2017

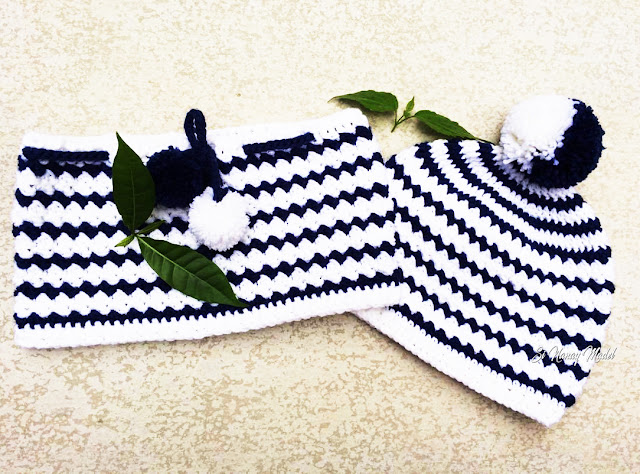
Billie Hat & Cowl (Cowl Pattern)


In this post, I will be posting the Cowl first. The Hat will be posted within this week also. This set will be available on my Ravelry listing as a SET and will be up for a small amount for the PDF download.


Materials (Cowl only)
  • Red Heart with Love in White (150-180 yards) and True Blue (100-120 yards)
  • I/5.5 mm Crochet Hook
  • Tapestry Needle
  • Pompom Maker
  • Scissors
  Terms Used   
  • CH(s) – Chain(s)
  • SC – Single Crochet
  • HDC – Half Double Crochet
  • DC – Double Crochet
  • FPDC – Front Post Double Crochet
  • BPDC – Back Post Double Crochet

Gauge
·         10 DC – 3 inches


Special Stitch
Foundation Single Crochet- Chain 2, insert hook into the first chain, yarn over and pull up a loop. Yarn over again, and pull through all loops. *Insert the hook in the base of the previous stitch, yarn over and pull up a loop. Yarn over again and pull through all loops.* Just repeat this process until your desired length or desired number of foundation Single Crochet. If you want a video tutorial on how to make foundation single crochet, here is a link from Moogly.  

Difficulty
·          Beginner - Intermediate 


Cowl
R1. With Color A.  Make 90 Foundation SC. Join with a Slip stitch in first SC. (90sc)

R2. Ch2, *FPDC, BPDC * in each stitch till the end. Change to Color B and join with a slip stitch in first stitch.(90sts)

R3. CH1, SC & DC in the first stitch.* Skip a stitch, SC & DC in next stitch* Repeat till end.  Change to Color A and join with a slip stitch in the first stitch. ( 45 sc & dc cluster or 90 sts)

R4.CH1, SC & DC in the first stitch.* Skip a stitch, SC & DC in next stitch* Repeat till end. Do not change Color, join with a slip stitch in the first stitch. ( 45 sc & dc cluster or 90 sts)

R5. CH1, SC & DC in the first stitch.* Skip a stitch, SC & DC in next stitch* Repeat till end.  Change to Color B and join with a slip stitch in the first stitch. ( 45 sc & dc cluster or 90 sts)

R 6 - R18. Repeat R3 to R5 respectively until R 18 ending with R3.

R19.  With Color A. CH 1. SC in each stitches till the end and join with a slip stitch in first SC. ( 90 SC)

R20. Ch2, *FPDC, BPDC * in each stitch till end. Join with a slip stitch in the first stitch.(90 Sts)


Cord
Chains as long as you want the cord to be, then slip stitch back into the 2nd chain from the hook until the first chain. 

Weave all you ends and make your pompoms.

For the pompom on the cowl make it a little smaller the 2nd to the smallest pompom maker. Make one in blue and one in white.

First, attach the cord to the cowl then attach your pompoms on both ends of your cord.


In my next post, I will be posting the Hat pattern. This Set is actually available on my Ravelry Listing already. It is in PDF form for easy download and printing. You'll have to pay a minimal amount for it.


Update: For the Hat Pattern Click Here.  

Hope you enjoy making this project and don't forget to Tag me on Instagram and Twitter with your finished project and also like my Page in Facebook, Si Nanay Madel. I would love to see what you've done and Pin it also on Pinterest.

That's it, I hope you all learn something and enjoy this post. If you have any questions, comments or suggestions just leave a message in the comment box and I will gladly answer them. Thank you and God bless!


xoxo


Nanay Madel


Don't forget to share on Facebook, Pinterest, Twitter and more.  
**Please do not copy and post any pattern from this blog and claim it as your own. This pattern is limited to personal use only.  Please do not re-publish all photos from this blog as your own. You may make and sell products from my pattern. Please also link back to my post. Any link back will be much, much appreciated. Thank you very much. **
I always make sure to share also because I learned to crochet for free from some very generous bloggers

Thought of the Day

September 25, 2017

Our divine Lord is equal to any emergency. With Him nothing is impossible. - HP 17


Billie Hat and Cowl Set


I've been wanting to make a Hat and Cowl set Pattern. This time I was able to do it and was happy with the results. This is my very first set of Hat and Cowl and I hope everyone loves it. This set uses the same stitch pattern. The stitches are simple and easy to do. It's a combination of single crochet and double crochet in a stitch. 


I decided to add some pompom also with the cowl. They are small ones, not as big as in the hat.  The colors are in blue and white. But you can actually change the color if you want. 


To coordinate with the cowl pompoms I made the hat pompom also in blue and white.

How did I make the pompom to look like this? I used a pompom maker and wrap different colors on different sides of the maker.


I'd like to share some behind the scenes photos of the cowl. My youngest was with me while taking some photos of this one. When I first Snapped the photo I said, "I think it needed something with it." And he immediately put his dinosaurs and said that his dinosaurs needed to be there with the cowl. hahaha!

Dinos and Crochet! hahaha what an odd combination. My son who loves dinos also loves crochet actually. He is only 4, but he keeps on nagging me to teach him "crochep"  and also often watch crochet videos on Youtube if he is tired of watching his dinos videos.

It's so hard to teach a 4-year-old boy crochet. Have you tried teaching your younger children to crochet? any tips? I always tell him, I'll teach you more when you are old enough. He cannot even make a chain... poor boy. I think he just interested in it because I am on it. Not because he really wants to do it. We'll see when he is older if he still wants to learn "crochep" As of now he loves his dinos more than my crochet.

Patterns for the Hat and the Cowl will be posted separately this week.  But the pattern for the hat and the cowl will be in one download on my Ravelry later this week also. It will be up for a small amount. It will be in PDF form for easy printing and download. 

So see you later this week for the patterns of this set.

Hope you enjoy making this project and don't forget to Tag me on Instagram and Twitter with your finished project and also like my Page in Facebook, Si Nanay Madel. I would love to see what you've done and Pin it also on Pinterest.


xoxo

Nanay Madel

Don't forget to share on Facebook, Pinterest, Twitter and more.  
**Please do not copy and post any pattern from this blog and claim it as your own. This pattern is limited to personal use only.  Please do not re-publish all photos from this blog as your own. You may make and sell products from my pattern. Please also link back to my post. Any link back will be much, much appreciated. Thank you very much. **
I always make sure to share also because I learned to crochet for free from some very generous bloggers.

Thought of the Day

September 24, 2017

Come to Christ just as you are. Cast yourself wholly on His mercy. There is no difficulty that cannot be surmounted in His strength. - HP

Sunday, September 17, 2017

Mindy Hat


Here is another Hat Pattern for you all. I've been playing with some simple stitches and I was able to come up with this hat. All the stitches are easy and yet they all give a beautiful look on this hat when combined together. 
Materials
  • Red Heart Super Saver Buff
  • 5H/5.00 mm Crochet Hook
  • Tapestry Needle
  • Scissors
  • Button

Terms Use
  • CH(s) - Chain(s)
  • ST(s) - Stitch(es)
  • SC - Single Crochet
  • HDC - Half Double Crochet
  • DC - Double Crochet
  • Camel Stitch - a Stitch done in the 3rd loop of a Half Double Crochet


Instructions

R1. Make Magic Ring and secure it with a ST.  CH2,  12 DC into the ring. Closed the ring tightly and join with a slip stitch on first DC. ( 12 DC)

R2. CH 2, 2 DC in each ST around. Join with a slip stitch in first ST. ( 24 DC)

R3.  CH2, DC in first ST, 2 DC in next. *DC in next and 2 DC in next ST.* Repeat all the way around. Join with a slip stitch in first ST. (36 DC)

R4. CH 2, 1 DC in first 2 STs and 2 DC in next. * 1 DC in the next 2 STs and 2 DC in next * Repeat all the way around and join with a slip stitch in first ST. ( 48 DC)

R5. CH 1, 1 HDC in first 3 STs and 2 HDC in next. * 1 HDC in the next 3 STs and 2 HDC in next * Repeat all the way around and join with a slip stitch in first ST. ( 60 HDC)

R6.  CH1, SC in the 3rd loop (camel stitch)in each ST  all the way around, join with a slip stitch in first  ST. (60 SC)

R7. CH 2, 1 DC in first 4 STs and 2 DC in next. * 1 DC in the next 4 STs and 2 DC in next * Repeat all the way around and join with a slip stitch in first ST. ( 72 DC)

R8. CH 1, 1 HDC in first 5 STs and 2 HDC in next. * 1 HDC in the next 5 STs and 2 HDC in next * Repeat all the way around and join with a slip stitch in first ST. ( 84 HDC)

R9. CH 1, HDC in the 3rd loop (camel stitch) in each ST all the way around. Join with a slip stitch in first ST. (84HDC)

R10. CH1, 1 SC in each of the first 11 STs, 2 SC in next. * 1 SC in the next 11 STs, 2 SC in next* Repeat all the way around and join with a slip stitch in first ST ( 91 SC)

R11- R15. CH1, SC in first ST, DC in same ST. *Skip a ST, SC in next and DC in same ST*. Repeat all the way around and join with a slip stitch in first ST. ( 91 STS)

R16. CH 1, HDC in each ST all the way around. Join with a slip stitch in first ST. (91HDC)

R17. CH 1, SC in the 3rd loop (camel stitch) in each ST all the way around. Join with a slip stitch in first ST. (91 SC)


R18. CH 2, DC in each ST all the way around. Join with a slip stitch in first ST. (91 DC)

R19- R20. Repeat R16 and R 17 respectively.

R21- R25.   CH1, SC in first ST, DC in same ST. *Skip a ST, SC in next and DC in same ST*. Repeat all the way around and join with a slip stitch in first ST. ( 91 STS)

R26 - 30. Repeat R16 to R 20.

R31.CH 1, HDC in each ST all the way around. Join with a slip stitch in first ST. (91HDC)

R32. CH 1, HDC in the 3rd loop (camel stitch) in each ST all the way around. Join with a slip stitch in first ST. (91 HDC)

R33. CH 1, SC in the 3rd loop (camel stitch) in each ST all the way around. Join with a slip stitch in first ST. (91 SC)

R34.  Slip stitch in each stitch around, but make your slip stitches a little loose.  Then break yarn and weave all your ends. Then attach a wooden button to your hat. 


Hope you enjoy making this project and don't forget to Tag me on Instagram and Twitter with your finished project and also like my Page in Facebook, Si Nanay Madel. I would love to see what you've done and Pin it also on Pinterest.

That's it, I hope you all learn something and enjoy this post. If you have any questions, comments or suggestions just leave a message in the comment box and I will gladly answer them. Thank you and God bless!

xoxo


Nanay Madel


Don't forget to share on Facebook, Pinterest, Twitter and more.  
**Please do not copy and post any pattern from this blog and claim it as your own. This pattern is limited to personal use only.  Please do not re-publish all photos from this blog as your own. You may make and sell products from my pattern. Please also link back to my post. Any link back will be much, much appreciated. Thank you very much. **
I always make sure to share also because I learned to crochet for free from some very generous bloggers

Thought of the Day

September 17, 2017

Principle, right, honesty, should ever be cherished. - Mar 228

Sunday, September 10, 2017

Granny Hat


Yes, it is a Granny Hat. The stitches used in this hat are mostly composed of Granny Stitches. It's an easy stitch and can be used with any type of project.

*Update: I was corrected many times and said that this is not a granny stitch. My bad... Sorry for that. It is  Block Stitches. Thank you for those who noticed and informed me right away. But I will keep the name Granny Hat, since it's been up already. 

Materials

  • Red Heart Super Saver in any two colors ( Buff and Coffee)
  • H/5.0 mm Crochet Hook
  • Tapestry Needle
  • Scissors
Terms Used

  • CH(s) - Chain(s)
  • ST(s) - Stitch(es)
  • SC - Single Crochet
  • DC - Duble Crochet
*Beginning CH3 will be counted as a stitch in all Rounds of the Hat.

Instructions


Brim

Row 1.  Begin with Chain 11 with color A (buff), SC in the second CH from the hook. SC in each ST until the end. CH 1 and turn. (10 SC)

Row 2-87. SC in each STs (10 SC)

Join both ends by slip stitch both together. Then CH 1, turn to the right side and begin with Round 1 for the body of the Hat.

Body of the Hat

R1. SC in the first stitch and in all stitches around.  Squeeze in SC that is a multiple of 3 in this round. I made 90 SC in this round. Join with a slip stitch in first SC. (90 SC) Change to Color B (coffee)

R2.  CH 3, (count as the first DC). DC in all stitches. Join with a slip stitch on top of  beginning CH 3. (90 DC including the beg. CH3) Change back to Color A

R3.  DO NOT CH 1, SC directly over the beginning CH the previous round. Not ON TOP of CH3, but in between the CH3 and the first DC. Then skip 3 DC, *CH2, SC in between the last DC you've skipped and the next DC*. Repeat until the end. In the end, you'll only have 2 DC left, instead of 3. The beginning CH3 will complete the last 2 DC as a set. Join with a slip stitch in first SC. ( 30 CH2 spaces) Change back to Color B.

R4. CH 3,  3 DC in CH2 Space. 3DC in each CH2 space of previous round. In the last CH2, just do 2 DC. Join with a slip stitch on top of  beginning CH 3. (90 DC including the beg. CH3) Change back to Color A

R5. Repeat R3 but do not change color.

R6. Repeat R4, then change to Color B.

R7. Repeat R3, but do not change color 

Repeat R3 to R7 until Row 20. 

R21. Repeat R3 but with CH1 only in between instead of CH2.

R22. CH3, 1 Dc in each CH1 spaces.  Join with a slip stitch on top of beginning  CH3. 

R23. CH3, DC two together until the end.  Join with a slip stitch on top of beginning. Cut the yarn leaving a long tail.

Close the hat, by running through each stitch using a tapestry needle and the long tail, Cinched the hat tightly. And weave all ends.

Make your pom and add it to your hat.


I made another version. Using another type of yarn and a G hook. This still the same pattern but I add more SC in Round 1 but still in multiples of 3. And this one without a pom pom.


I love the colors on this one, it reminds me of some pumpkin pie. Yummy!

Hope you enjoy making this project and don't forget to Tag me on Instagram and Twitter with your finished project and also like my Page in Facebook, Si Nanay Madel. I would love to see what you've done and Pin it also on Pinterest.

That's it, I hope you all learn something and enjoy this post. If you have any questions, comments or suggestion just leave a message in the comment box and I will gladly answer them. Thank you and God bless!


xoxo


Nanay Madel


Don't forget to share on Facebook, Pinterest, Twitter and more.  
**Please do not copy and post any pattern from this blog and claim it as your own. This pattern is limited to personal use only.  Please do not re-publish all photos from this blog as your own. You may make and sell products from my pattern. Please also link back to my post. Any link back will be much, much appreciated. Thank you very much. **
I always make sure to share also because I learn to crochet for free from some very generous bloggers


Thought of the Day

September 10, 2017

Give thanks to the LORD, for he is good: for his mercy endures for ever. Let the redeemed of the LORD say so, whom he has redeemed. - Ps 107:1

Thursday, September 7, 2017

Solid Granny Square Tutorial

Here is another Granny Square Tutorial. There are so many types of granny squares. With this tutorial, I am writing a step by step procedure on how to make a SOLID GRANNY SQUARE with pictures.

Materials

  • Cotton Yarn or Any Type of yarn actually
  • G/4.0mm Crochet Hook or any hook that suits your yarn
  • Tapestry Needle
  • Scissors
Terms Used
  • ST(s) - Stitch(es)
  • CH(s) - Chain(s)
  • SL ST - Slip Stitch
  • DC - Double Crochet
Let's get started:

R1. Make Magic Ring, and secure it with a stitch. 


CH3

DC, CH 2 into the ring.* 3 DC, CH 2* Repeat 3 times. Then DC again into the ring, join with a SL ST on top of Beg. CH 3. You'll end up with 3 sets of 3DC and CH 2 and a CH3 and 2DC set. The CH2 in between will be the corners of your square. Closed the ring tightly.


R2. CH3, DC in next ST, 2 DC, CH2, 2DC in CH2 space. * DC in each of the next 3 STs, 2 DC, CH2, 2DC in CH2 space* Repeat 3 times.  DC in next ST, join with a SL ST on top of Beg. CH 3.


R3. CH 3, DC in the next 3 STs, 2 DC, CH2, 2 DC in CH2 space. * DC in each of the next 7 STs, 2 DC, CH2, 2DC in CH2 space* Repeat 3 times. DC in the last 3 STs, join with a SL ST in the top of Beg. CH3.


R4. CH3, DC in the next 5 STs, 2 DC, CH2, 2DC in CH2 space. * DC in each of the next 11 STs, 2 DC, CH2, 2DC in CH2 space* Repeat 3 times. DC in the last 5 STs.


Break yarn and join with an invisible join. Weave in all ends.
How to join with an invisible join.


If you would like to add more rows, you can continue to do so, just do DC in each STS and 2 DC, CH2, 2DC in CH2 spaces.

Again I say that it is very important that you block your squares before joining them for your project. As you can see below the difference between blocked square and unblock square.
There are so many types of blocking your work. But blocking this squares inside a book will do just fine also. Since my squares are not that big. I am amazed because it worked. 

Maybe because of the type of yarn I am using. I am using Milk Cotton yarn. If it won't work on you there are many options on the web. There are many ways to block your square. It may look like an inconvenience and too time-consuming, but it's so worth it. You can appreciate your work more if you blocked them. Here are some from Repeat Crafter Me, 1 Dog Woof and Look What I Made.
  1. Crochet Pixel Square Blocking (docking) Station
  2. Modular Crochet Blocking Station
  3. DIY Blocking Station for Crochet Squares
They are all kind of the same. This is the easiest I can find on the net. Mostly DIY, you don't need to buy those expensive Blocking Kits.

So I hope you will give blocking a go. Same with me before, I hate it that is why I don't do much crocheting a blanket or anything that needs blocking. But eventually, as you go on crocheting you can't avoid blocking. And it is so worth it.

Hope you also enjoy making this and don't forget to Tag me on Instagram and Twitter with your finished project and also like my Page in Facebook, Si Nanay Madel. I would love to see what you've done and Pin it also on Pinterest.

So that's it. I hope you all learn something and enjoy this post. If you have any questions, comments or suggestion just leave a message in the comment box and I will gladly answer them. Thank you and God bless!

xoxo


Nanay Madel


Don't forget to share on Facebook, Pinterest, Twitter and more.  
**Please do not copy and post any pattern from this blog and claim it as your own. This pattern is limited to personal use only.  Please do not re-publish all photos from this blog as your own. You may make and sell products from my pattern. Please also link back to my post. Any link back will be much, much appreciated. Thank you very much. **
I always make sure to share also because I learn to crochet for free from some very generous bloggers

Thought of the Day

September 7, 2017

The Bible is the only rule of faith and doctrine. Only Bible truth and Bible religion will stand the test of the judgment. - BLJ 129